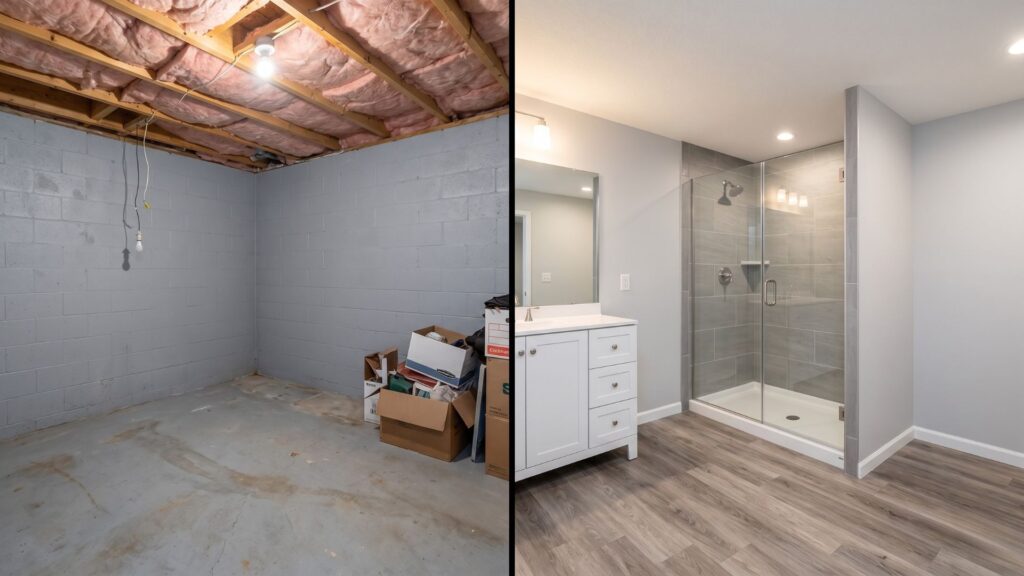
A basement bathroom addition costs between $12,000 and $45,000 in Minnesota, depending on whether you already have rough-in plumbing and what type of drainage system you need. Most projects take 3-6 weeks from demo to final fixtures. The three main installation methods are: conventional plumbing (requires breaking concrete, $15,000-$25,000), sewage ejector systems (needs a pump pit, $18,000-$35,000), or upflush macerating toilets (no concrete work, $12,000-$22,000).
That’s the quick answer. But here’s what actually matters: whether adding a basement bathroom makes sense for your situation, and which installation method fits your home’s layout and your budget.
I’ve worked with hundreds of Twin Cities homeowners on basement remodels, and the bathroom question always comes up. Sometimes it’s a no-brainer — you’re finishing the basement for a teenager or in-law, and they need their own bathroom. Other times, people assume they need one when they might not. Let’s walk through everything.
Is It Worth Putting a Bathroom in Your Basement?
Here’s the honest answer: it depends on how you’re using the space.
When a basement bathroom makes complete sense:
You’re creating a living space down there — bedroom, guest suite, rec room where people actually hang out. Nobody wants to run upstairs every time they need a bathroom, especially if you’re entertaining or someone’s sleeping downstairs.
The ROI is solid. According to Remodeling Magazine’s 2025 Cost vs. Value Report, basement bathrooms recoup about 58-63% of their cost at resale in the Minneapolis-St. Paul metro. Not spectacular, but decent — and the real value is in daily usability.
How Basement Bathrooms Stack Up Against Other Remodels:
| Remodel Project | Average Cost | Resale Value Recouped | Payback Timeline |
|---|---|---|---|
| Basement Bathroom | $22,000 | 58-63% | 8-12 years |
| Minor Kitchen Remodel | $28,000 | 67-72% | 6-9 years |
| Bathroom Remodel (upstairs) | $25,000 | 62-68% | 7-10 years |
| Basement Finishing (no bath) | $18,000 | 52-58% | 10-14 years |
| Master Suite Addition | $165,000 | 48-55% | 15-20 years |
The numbers tell one story, but daily use tells another. If you’re finishing your basement as actual living space — not just storage — a bathroom becomes essential, not optional.
Looking to maximize your basement’s potential? Check out our complete basement finishing guide to see how bathrooms fit into the bigger picture.
When you might want to wait:
Your basement is just storage or a laundry room. The $15,000-$30,000 you’d spend on a bathroom might make more sense going toward finishing the space first, or into a kitchen or main floor bathroom remodel that you’ll use every single day.
You’re planning to move within 2-3 years. You won’t get your money back that fast.
Here’s something nobody tells you: basement bathrooms need more maintenance than upstairs ones. Ejector pumps (which most basements need) can fail, usually at the worst possible time. I’m not trying to scare you off — just pointing out there’s a maintenance cost most people don’t budget for.
The Three Ways to Add a Basement Bathroom (And When to Use Each)
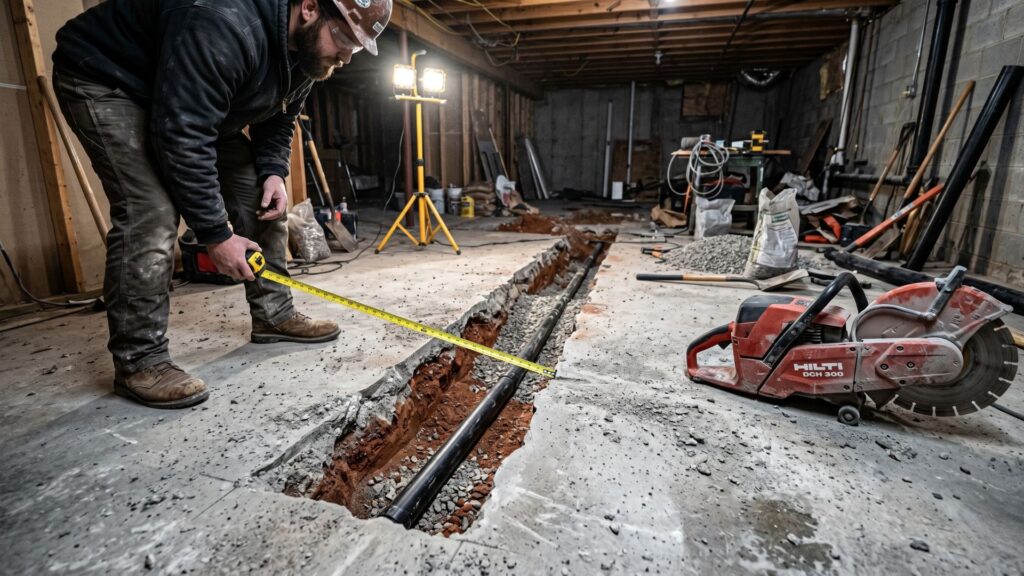
The biggest decision you’ll make is how to handle drainage. Your basement floor sits below your home’s main sewer line, which means waste can’t flow downhill on its own. You have three options.
Method 1: Conventional Plumbing with Gravity Drainage
- What it is: If your sewer line exits your house at basement level or below, you can connect bathroom drains directly to the main line. Waste flows downhill naturally. No pumps required.
- Cost: $15,000 – $25,000 for a full bathroom
- Timeline: 3-4 weeks
- The catch: This only works if your main sewer line is at or below your basement floor level. Many homes built before 1980 in Lakeville and the Twin Cities have this setup. Newer homes with deeper sewer lines do not.
- You’ll need to break concrete to run drain pipes. Figure on cutting a 12-18 inch wide trench from your new bathroom to the main stack. The concrete work alone runs $800-$1,500, and that’s just cutting and removing it. Patching it afterward adds another $600-$900.
- Best for: Older homes with low sewer exits, situations where you want the simplest long-term setup with no mechanical parts to maintain.
Method 2: Sewage Ejector Pump System
- What it is: A basin buried in your basement floor collects waste from your toilet, sink, and shower. When it fills, a pump automatically lifts waste up to your main sewer line.
- Cost: $18,000 – $35,000 for a full bathroom
- Timeline: 4-6 weeks (includes pit excavation, pump installation, electrical)
- The reality: This is the most common solution for modern Minnesota basements. Your contractor digs a pit (typically 24 inches in diameter, 30-36 inches deep), installs a basin and pump, runs a discharge pipe up to your main sewer line, and connects everything to a dedicated electrical circuit with GFCI protection.
Ejector pumps work great — when they’re installed correctly. Bad installations cause problems. The basin needs a sealed lid with a vent pipe to prevent sewage gases from entering your basement. The discharge pipe needs a check valve so waste doesn’t flow backward when the pump shuts off. And you need access to the basin for future pump service.
The pump itself costs $300-$600. It’ll last 7-10 years with normal use, then you’ll need to replace it. Budget $400-$700 for a replacement including labor.
- Best for: Most modern basements where the sewer line exits above the basement floor. Any basement bathroom that includes a toilet and shower.
- Minnesota-specific note: I always tell clients to add a battery backup system ($400-$800). We get heavy rains and power outages. The last thing you want is a basement full of sewage because a storm knocked out power and your pump couldn’t run. The backup system includes a battery that powers the pump during outages.
Planning a basement bathroom as part of a larger basement finish? Our team at College City Design Build can help you design the entire space for maximum functionality and value. Explore our basement remodeling services.
Method 3: Upflush (Macerating) Toilet System
- What it is: A self-contained unit that sits behind or beside your toilet. It grinds waste into slurry and pumps it through a small (3/4 to 1 inch) pipe to your main drain. No concrete breaking required.
- Cost: $12,000 – $22,000 for a 3/4 bathroom
- Timeline: 2-3 weeks
- The trade-off: You avoid digging up your floor, which saves money and mess. Installation is faster and less invasive. But the unit is louder than a regular toilet (you’ll hear the pump run for 10-15 seconds after each flush), and you’re adding a mechanical component that can fail.
These systems work best for powder rooms or small bathrooms where noise isn’t a huge concern. I wouldn’t recommend them for a primary bathroom or guest suite where someone might be showering or using the toilet at 6 AM while others are sleeping.
The pump units cost $1,000-$1,800. They typically last 5-8 years, then need replacement. Parts are readily available, but service calls run $200-$400.
- Best for: Small powder rooms, wet bars with a sink and toilet, situations where breaking concrete isn’t feasible (like if you have in-floor radiant heating), or tight budgets where you need a bathroom but can’t afford conventional plumbing.
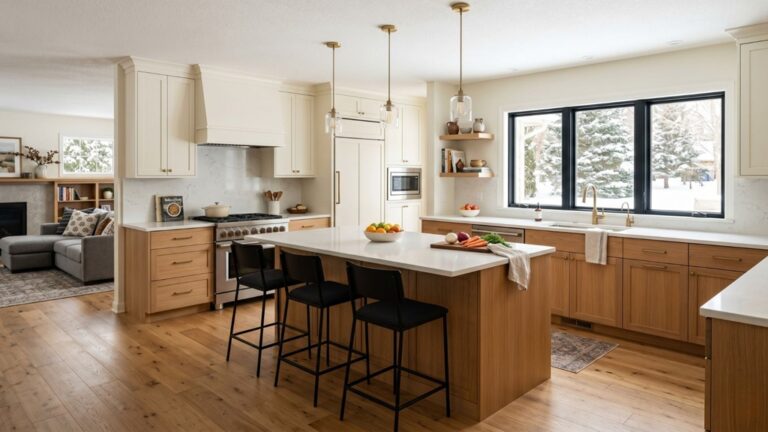
Remodeling other areas of your home? Check out our kitchen remodel services.
Basement Bathroom Layout Ideas That Actually Work
Here’s what I’ve learned about basement bathroom layouts after working on dozens of them: your options are more limited than upstairs bathrooms because you’re working around your plumbing stack, your electrical panel, your HVAC equipment, and often low ceilings or support posts.
Need help designing a bathroom layout that works with your basement’s unique challenges? Our design team at College City Design Build creates custom bathroom designs that maximize every square foot.
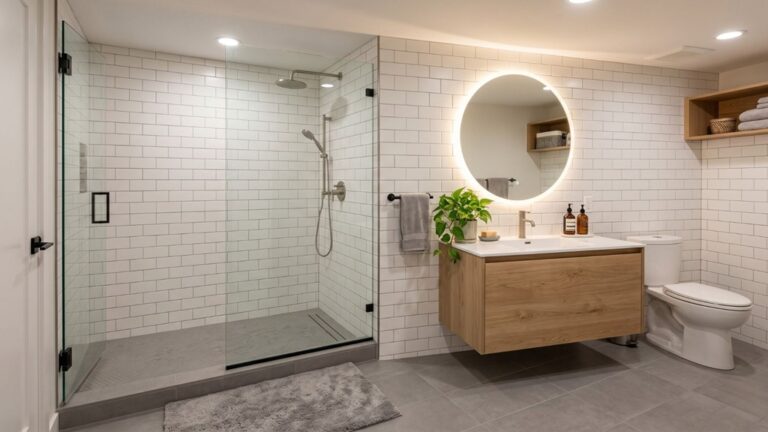
The 5×8 Three-Quarter Bath (Most Common)
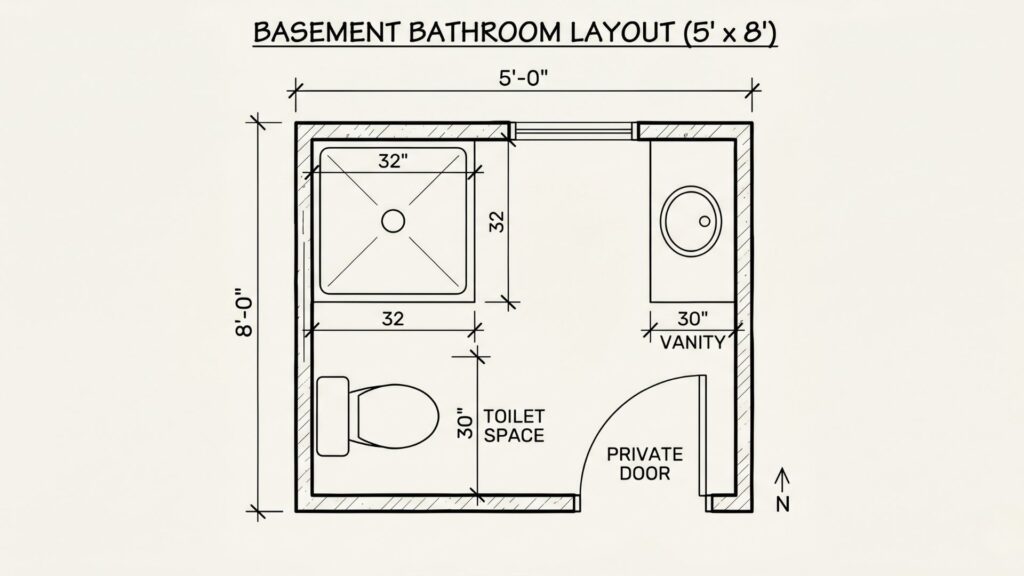
This is the layout I recommend most often. It includes a shower, toilet, and sink in 40 square feet. Tight, but everything fits without feeling cramped.
- Layout: Put the toilet on the wall closest to your main plumbing stack. The shower goes beside it (saves on plumbing runs). The vanity goes on the opposite wall.
- Why it works: Clustering your fixtures near the main stack cuts plumbing costs by $800-$1,500. You’re running shorter drain lines and fewer vent pipes.
- Cost estimate: $18,000 – $28,000 depending on finishes
The 6×8 Full Bath
Add a bathtub instead of just a shower. Same 48 square feet, but you gain a tub (which matters for families with young kids or for resale).
- Layout: Tub along the back wall, toilet beside it, vanity on the side wall.
- Why this might not work: Tubs require more water (and thus a bigger drain), and they’re heavy when filled. If your floor joists aren’t rated for the load, you’ll need to add structural support. That adds $1,200-$2,500 to your project.
- Cost estimate: $22,000 – $32,000
The Powder Room (5×5)
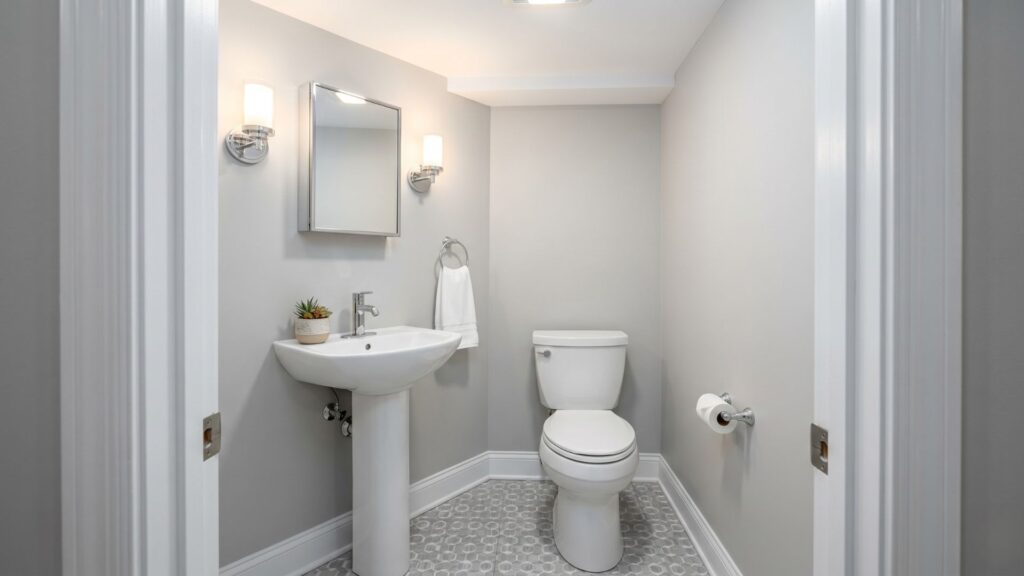
Just a toilet and sink in 25 square feet. Perfect if you’re adding a bathroom primarily for guests or for when you’re entertaining downstairs.
- Layout: Toilet on one wall, pedestal sink or small vanity on the adjacent wall.
- Cost estimate: $12,000 – $18,000
- Why powder rooms are smart: They’re cheaper, faster to build, and often all you actually need. Most basement bathrooms don’t get heavy daily use. A powder room handles 80% of what you’d use a full bath for, at 60% of the cost.
Ready to create a basement bathroom that fits your family’s needs? Schedule a consultation with College City Design Build to discuss your project.
Breaking Down the Real Cost (Not the Estimates You’ll See Online)
Online cost calculators give you ranges like “$10,000-$50,000” which is useless. Here’s what you’ll actually spend broken down by category, based on real projects we’ve completed in Lakeville and the Twin Cities in 2025-2026.
For a Standard 5×8 Three-Quarter Bath with Ejector Pump:
Demolition & concrete work: $1,200 – $2,000
- Cutting concrete for drain lines
- Removing concrete and debris
- Cutting access to main stack if needed
Framing & drywall: $1,800 – $2,800
- 2×4 framing for walls
- Moisture-resistant drywall
- Taping, mudding, sanding
- Door frame and door
Plumbing (the big one): $6,500 – $10,000
- Ejector pump and basin: $800-$1,200
- Rough-in plumbing (drains, vents, supply lines): $2,500-$4,000
- Toilet: $200-$600
- Shower valve and fixtures: $400-$1,200
- Vanity faucet: $150-$400
- Installation labor: $2,500-$3,500
Electrical: $1,200 – $2,000
- Dedicated circuit for ejector pump
- GFCI outlets
- Bathroom fan and light fixtures
- Rough-in and finish electrical work
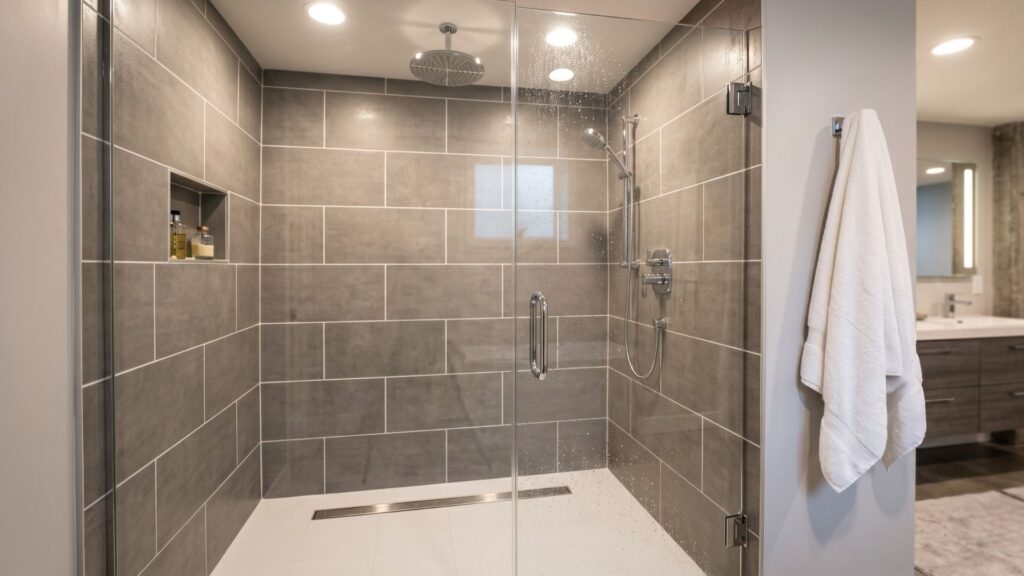
Shower: $3,000 – $5,500
- Shower pan or tile base: $800-$1,500
- Tile walls or surround: $1,200-$2,500
- Glass door: $700-$1,200
- Installation labor included above
Flooring: $800 – $1,500
- Luxury vinyl plank (LVP) or ceramic tile
- Underlayment if needed
- Installation
Vanity & mirror: $600 – $1,800
- Stock vanity: $400-$800
- Custom vanity: $1,200-$2,500
- Mirror and medicine cabinet: $150-$400
Ventilation: $400 – $700
- Bathroom exhaust fan (required by code)
- Ductwork to exterior
- Installation
Permits & inspections: $300 – $600
- Building permit
- Plumbing inspection
- Electrical inspection
Total: $15,800 – $27,400
That’s for mid-range finishes — builder-grade fixtures, decent tile, stock vanity. Want marble floors, a rainfall showerhead, and custom cabinetry? Add $8,000-$15,000.
Understanding Fixture Quality & Lifespan
Not all bathroom fixtures are created equal. Here’s what you can expect from different quality tiers:
| Fixture | Budget Grade | Mid-Range | Premium | Expected Lifespan |
|---|---|---|---|---|
| Toilet | $150-$300 (Glacier Bay, AquaSource) | $350-$700 (Kohler, American Standard) | $800-$2,500 (Toto, Duravit) | 15-20 years (all grades) |
| Shower Valve | $80-$150 (Delta, Peerless) | $200-$400 (Kohler, Moen) | $500-$1,200 (Grohe, Hansgrohe) | Budget: 8-12 yrs / Premium: 20+ yrs |
| Vanity | $200-$500 (particle board, basic hardware) | $600-$1,500 (plywood, soft-close) | $2,000-$5,000 (custom, quality hardwood) | Budget: 5-8 yrs / Premium: 25+ yrs |
| Faucet | $40-$100 (generic brands) | $150-$350 (Moen, Delta) | $400-$900 (Kohler, Brizo) | Budget: 5-8 yrs / Premium: 15-20 yrs |
| Exhaust Fan | $30-$80 (builder grade) | $100-$250 (Broan, Panasonic) | $300-$600 (ultra-quiet, humidity sensing) | Budget: 5-7 yrs / Premium: 15+ yrs |
| Shower Door | $200-$400 (framed, stock) | $500-$900 (semi-frameless) | $1,200-$2,500 (frameless, heavy glass) | All grades: 15-25 years |
The smart approach: Spend on items you touch daily (shower valve, faucet) and things that affect function (exhaust fan, toilet quality). Save on decorative elements you can upgrade later (mirrors, lighting, towel bars).
Ways to Stay on the Lower End of That Range:
- Position your bathroom directly below an existing one. Your plumbing stack is already there. You’re just tapping into it. Saves $1,500-$3,000 in plumbing runs.
- Use LVP flooring instead of tile. Looks nearly identical, costs 40% less, installs faster.
- Pick a prefab shower base instead of a custom tile base. Pre-made acrylic or fiberglass bases start at $300. A custom tile base runs $1,200-$2,000.
- Stock vanity from Home Depot or Menards. $400-$700 versus $1,500+ for custom.
- Do your own demolition. If you’re handy and have time, you can save $800-$1,200 by removing old concrete and doing demo work yourself. Leave the actual plumbing, electrical, and structural work to pros.
Adding a Bathroom Without Breaking Concrete (Is It Possible?)
Yes, with an upflush toilet system. I covered these earlier, but let me give you the realistic picture.
An upflush system (brands like Saniflo, Liberty, Saniplus) mounts behind your toilet. It grinds waste and pumps it through a small pipe that runs to your main drain, usually along your basement ceiling or tucked into a wall. You don’t break any concrete.
What you save:
- $800-$1,500 on concrete cutting and removal
- $400-$800 on concrete patching
- 3-5 days of messy demolition work
- Risk of discovering problems when you cut into the floor
What you accept:
- Noise. The grinder runs for 10-15 seconds after each flush. It’s not loud enough to wake people upstairs, but you’ll hear it in the basement.
- Maintenance. These units fail more often than conventional plumbing. Budget for a replacement every 5-8 years.
- Limitations. Most upflush systems can handle a toilet, sink, and shower, but check the specs. Some can’t handle certain configurations.
When this makes sense:
You’re adding a powder room or small bathroom where noise isn’t a dealbreaker. The bathroom is far from your main plumbing stack (which would make conventional plumbing expensive anyway). You have in-floor radiant heating and can’t break the concrete without damaging it. Your budget is tight and you need to save $2,000-$3,000.
When to avoid it:
You’re building a primary bathroom or guest suite. You plan to use it heavily (multiple times per hour). The system would need to pump waste more than 15 vertical feet or 150 horizontal feet (most units max out around there).
Cost for a 5×6 powder room with upflush system: $12,000-$18,000
Permits, Codes, and Inspections (Don’t Skip This Part)
Minnesota requires building permits for basement bathrooms. Not optional. Here’s what you’re dealing with:
What you need:
- Building permit from your city ($150-$400 depending on project scope)
- Plumbing permit (often included in building permit, sometimes separate)
- Electrical permit if you’re adding circuits ($50-$150)
Inspections you’ll face:
- Rough-in plumbing inspection (before covering walls)
- Rough-in electrical inspection (before closing walls)
- Final inspection (after everything’s complete)
Timeline impact: Each inspection adds 2-5 days to your project while you wait for the inspector. In Lakeville and most Twin Cities suburbs, you can usually schedule within 3-4 business days. In busy summer months, it might be a week.
Why you can’t skip permits:
Your homeowner’s insurance won’t cover water damage or sewage issues from unpermitted work. When you sell your home, unpermitted bathrooms become a disclosure nightmare. Banks won’t lend on homes with unpermitted bathrooms. And if something goes wrong (sewage backup, flooding), you’re personally liable.
I’ve had clients who bought homes with unpermitted basement bathrooms. It cost them $6,000-$12,000 to bring everything up to code after the fact — tearing out walls to expose plumbing, redoing electrical, failing inspections and fixing violations. Not worth it.
What code requires (Minnesota residential building code):
According to the Minnesota Department of Labor and Industry residential building code standards:
Toilet must have at least 15 inches of clearance from center to any wall or fixture on each side. Minimum 21 inches of clearance in front of the toilet. Bathroom must have either a window (3 square feet minimum) or a mechanical ventilation fan that exhausts to the exterior (50 CFM minimum). GFCI-protected outlets within 6 feet of water sources. Dedicated 20-amp circuit for bathroom outlets (can be shared with other bathrooms, but not with non-bathroom areas). All plumbing must be vented properly to prevent sewage gases from entering living spaces.
Thinking about expanding your home instead? Compare costs and timelines in our home addition ideas guide.
Timeline: How Long Does It Actually Take?
Online you’ll see “4-8 weeks” for a basement bathroom. That’s technically true, but misleading. Here’s the real breakdown:
Week 1: Planning, permits, demolition
- Submit permit applications (if contractor doesn’t handle this)
- Wait for permit approval (3-7 days in most Twin Cities suburbs)
- Order fixtures and materials
- Demo work (if any)
- Cut concrete for drain lines (if using conventional plumbing)
Week 2-3: Rough-in work
- Install ejector pump basin (if applicable)
- Run drain pipes and vent lines
- Run water supply lines
- Install shower pan or base
- Frame walls
- Rough-in electrical (outlets, lights, fan, circuits)
- Schedule and pass rough-in inspections (plumbing and electrical)
Week 3-4: Insulation and drywall
- Insulate exterior walls
- Hang and finish drywall
- Let mud dry between coats (this takes time)
- Prime walls
Week 4-5: Finishes
- Tile work (shower walls, floor if applicable)
- Let tile mortar and grout cure
- Install toilet, vanity, fixtures
- Install bathroom fan and lights
- Paint walls
- Install flooring (if not tiled)
Week 5-6: Final details and inspection
- Install mirrors, towel bars, toilet paper holder
- Caulk and seal
- Touch-up paint
- Final cleanup
- Schedule and pass final inspection
What actually delays projects:
Permit approval taking longer than expected (add 1-2 weeks). Waiting for special-order fixtures or materials (add 2-4 weeks). Failed inspections requiring rework (add 3-7 days per failed inspection). Discovering issues during demolition — old cast iron pipes, asbestos tile, water damage (add 1-3 weeks).
Realistic timeline: 5-7 weeks from permit application to final inspection for a straightforward project with no surprises. Add 2-4 weeks if you’re ordering custom materials or encounter issues during demo.
Timeline Comparison: How Different Scenarios Affect Your Schedule
Installation complexity significantly impacts project timelines. Here’s how different scenarios stack up:
| Scenario | Timeline | Key Factors |
|---|---|---|
| Ideal: Rough-in already present, conventional plumbing | 3-4 weeks | Pre-existing drain lines, minimal concrete work, straightforward layout |
| Standard: Ejector pump needed, normal conditions | 5-6 weeks | Basin excavation, pump installation, standard inspection schedule |
| Complex: No rough-in, custom fixtures, older home | 7-10 weeks | Extensive plumbing runs, dealing with old systems, potential asbestos/lead issues |
| Upflush system, simple layout | 3-4 weeks | No concrete work, faster rough-in, fewer inspections needed |
| Custom tile work, high-end finishes | 6-8 weeks | Extended tile installation, special-order materials, detailed finishing work |
| Winter installation (November-March) | +1-2 weeks | Concrete curing issues, supply delivery delays, limited contractor availability |
| Permits delayed or failed inspection | +2-4 weeks | Re-inspection scheduling, correction work, permit office backlogs |
Pro tip: Start your project in April-May or September-October. You’ll get better contractor availability, faster permit approvals, and ideal concrete curing conditions. Avoid December-February when everything slows down.
Looking for more storage solutions for tight spaces? Check out our guide on small bathroom storage ideas.
Should You DIY or Hire a Pro?
Be honest with yourself about this one.
You can potentially DIY:
- Demolition and concrete removal (save $800-$1,200)
- Framing walls (save $800-$1,200)
- Drywall hanging and finishing (save $1,000-$1,500)
- Painting (save $400-$800)
- Installing the toilet and vanity (save $300-$600)
You absolutely should hire licensed pros for:
- Plumbing rough-in and ejector pump installation (required by code)
- Electrical work (required by code)
- Concrete cutting (specialized equipment, skill required)
- Waterproofing and shower pan installation (mistakes here cost thousands to fix)
The math: If you’re skilled and have time, you can save $3,000-$5,000 doing finish work yourself. But you still need to pay $10,000-$20,000 for professional plumbing, electrical, and structural work.
When DIY makes sense:
You have real construction skills, not YouTube skills, but actual experience framing, drywalling, or tiling. You understand plumbing basics and can intelligently oversee the pros you hire. You have time to manage the project (it’ll take 3x longer than you think). The project is straightforward with no surprises.
When to hire it all out:
You don’t have time to dedicate 40-60 hours over 6-8 weeks. Your home is older and likely to have surprises (asbestos, lead pipes, structural issues). You want it done right and warrantied. You need it done fast.
Frequently Asked Questions
Do I need an ejector pump for a basement bathroom?
You need an ejector pump if your basement floor sits below your home’s main sewer line exit point. Most homes built after 1980 in Minnesota require ejector pumps for basement bathrooms because the sewer line exits above basement level. Older homes with sewer lines at or below basement level may not need pumps. A plumber can determine this during a site visit in about 20 minutes.
Can I add a basement bathroom without breaking concrete?
Yes, using an upflush macerating toilet system. These units grind waste and pump it through a small pipe to your main drain without requiring underground plumbing. Systems from Saniflo or Liberty cost $1,000-$1,800 and can handle a toilet, sink, and shower. You save $1,200-$2,300 on concrete work, but the units are louder than conventional toilets and require replacement every 5-8 years.
What is the best layout for a small basement bathroom?
A 5×8 foot layout works best for most basement bathrooms. Position the toilet on the wall closest to your main plumbing stack, place the shower beside it, and install the vanity on the opposite wall. This clusters all plumbing fixtures near existing pipes, reducing installation costs by $800-$1,500. The layout provides enough room for all three fixtures without feeling cramped.
How long does it take to add a bathroom to a basement?
Expect 5-7 weeks from permit application to final inspection for a straightforward basement bathroom project. This includes 3-7 days for permit approval, 2-3 weeks for rough-in plumbing and electrical work, 1-2 weeks for drywall and tile installation, and 1 week for fixture installation and final inspection. Projects with special-order materials or unexpected issues can take 8-10 weeks.
Do I need a permit to add a basement bathroom in Minnesota?
Yes, all Minnesota cities require building permits for basement bathrooms. Permits typically cost $150-$600 depending on your location and project scope. You’ll need inspections for rough-in plumbing, rough-in electrical, and final completion. Unpermitted bathroom work voids insurance coverage for water damage, creates disclosure problems when selling your home, and may need to be removed or brought to code retroactively.
What size bathroom can I fit in my basement?
Most basement bathrooms fit in 40-80 square feet. A powder room (toilet and sink only) needs just 25 square feet (5×5). A three-quarter bath (toilet, sink, shower) requires about 40 square feet (5×8). A full bath (toilet, sink, tub) needs 48-60 square feet (6×8 to 6×10). Measure carefully and account for door swing, which requires 21-24 inches of clear space.
Is adding a basement bathroom a good investment?
Basement bathrooms recoup about 58-63% of their cost at resale in the Minneapolis-St. Paul metro area, according to Remodeling Magazine’s 2026 data. The real value comes from daily usability if you’re finishing your basement for living space. A basement bedroom or guest suite without a bathroom is significantly less functional and harder to sell than one with a bathroom.
Your Next Steps
If you’re seriously considering a basement bathroom, here’s what to do:
- Determine if you have rough-in plumbing.
- Get three quotes.
- Ask contractors questions.
- Check references.
- Plan for the disruption.
At College City Design Build, we’ve added bathrooms to dozens of basements across Lakeville and the South Metro. We handle everything (permits, plumbing, electrical, tile, finishes) and we work with you to design a bathroom that fits your space and your budget.
Ready to explore your options? Contact us for a free consultation. We’ll visit your home, assess your plumbing situation, and give you a realistic estimate for your basement bathroom project.