
What you need to know now about this bathroom remodel checklist:
- A complete bathroom remodel checklist covers budget and contingency, contractor vetting, permits, fixture selection, and a final walkthrough, in that order.
- Skipping the contingency step is the single biggest reason Minnesota bathroom remodels run over cost.
- Most Twin Cities bathroom permits take 1 to 4 weeks to process, so applying late is the most common schedule killer.
- Custom tile and frameless glass often need 4 to 8 weeks of lead time, which means ordering before demo starts, not after.
Work through this checklist in order and you’ll walk into your first contractor meeting already ahead of most homeowners.
Why Do You Need a Checklist Before You Call a Contractor?
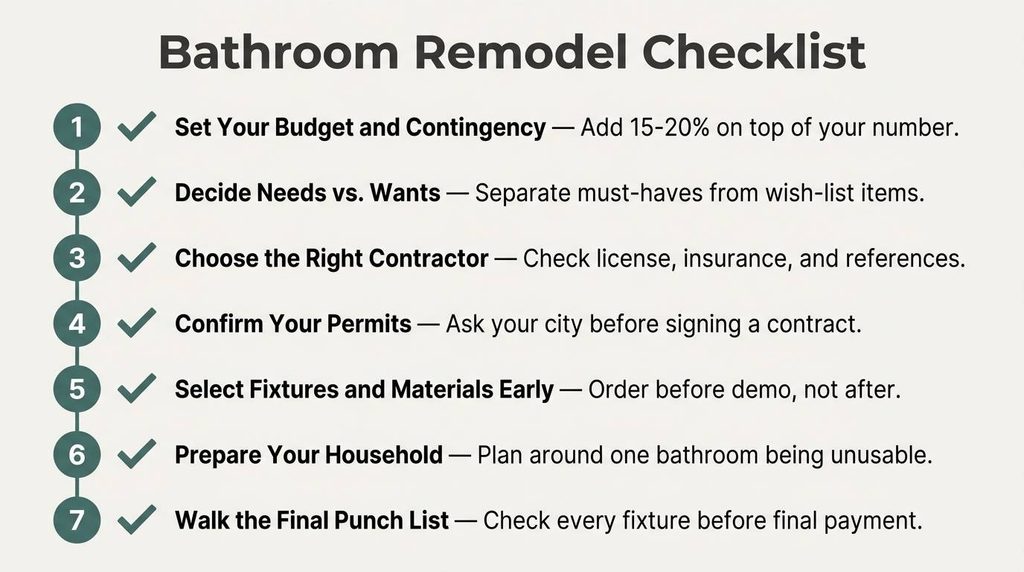
A bathroom remodel checklist gives you a fixed order of decisions to make before demo day, so you’re not making them under pressure once your only bathroom is a construction site. Homeowners who skip straight to picking tile usually end up reworking their budget, their permit, or their fixture order later.
I’ve watched this play out the same way for years.
Someone falls in love with a shower on Pinterest before they’ve set a real number.
Then the estimate comes back and the number doesn’t match the picture.
Want the full cost picture before you start checking boxes? We broke down real 2026 Twin Cities bathroom pricing by project type. Read: Bathroom Remodeling in Minnesota Costs →
This checklist puts the boring decisions first, on purpose. Budget and permits aren’t exciting. They’re also the two things that blow up timelines when they’re an afterthought.
Who This Checklist Is For
- Homeowners who haven’t hired a contractor yet.
- Anyone who’s gotten one estimate and felt sticker shock.
- Households planning around a single working bathroom during construction.
Step 1: How Much Contingency Should You Budget For?
A 15 to 20 percent contingency on top of your total budget is the right target for most Twin Cities bathroom remodels. Set that ceiling before you look at a single tile sample. That contingency isn’t optional padding. It’s the line item that covers what your contractor finds once your walls are open.
Older Twin Cities homes hide the same handful of surprises.
Subfloor moisture damage. Outdated wiring that fails a current GFCI check. Galvanized supply lines nobody’s touched since the house was built.
None of that shows up in an estimate written before demo.
Budget Checklist
- Decide on a firm ceiling number, not a range you’ll stretch.
- Add 15 to 20 percent contingency on top of that number.
- Separate “must spend” (plumbing, electrical, waterproofing) from “nice to have” (upgraded tile, custom vanity).
- Get written estimates from at least two contractors before committing.
Want a ballpark number before you talk to anyone? Our free planning guide and idea book help you think through scope before you ever get a quote. Download Our Free Planning Guide →
Step 2: How Do You Separate Needs From Wants?
Separate your must-haves from your wish list before your first contractor meeting, since this single step prevents most mid-project scope changes. A must-have solves a real daily problem. A want makes the bathroom nicer but doesn’t fix anything that’s actually broken.
Signs Something Is a Must-Have
- The current layout is a safety issue: no grab bars for an aging parent, a slick tub for young kids.
- A fixture is actively failing: a leaking valve, a toilet that’s cracked, a fan that doesn’t vent.
- The bathroom doesn’t fit your household anymore: one sink for three people who all leave for work at the same time.
Signs Something Is a Want
- A specific tile pattern you saw once and can’t stop thinking about.
- A freestanding tub you’ll use twice a year.
- A double vanity in a bathroom only one person uses daily.
Wants aren’t wrong. They’re just the first thing to cut if your contingency gets used up early.
Step 3: How Do You Choose the Right Contractor?
Choose a contractor who is licensed, carries insurance, and can show you completed projects similar in scope to yours, and get every promise in writing before signing anything. The wrong contractor turns every other item on this checklist into a fight.
According to NARI, the National Association of the Remodeling Industry, a midrange bathroom remodel recouped about 74 percent of its cost at resale in its most recent 2025 Remodeling Impact Report, but that return depends entirely on the work being done correctly the first time.
Questions to Ask Every Contractor
- How do you organize and manage a project like mine?
- Who is my single point of contact once work starts?
- Do you handle design and construction under one contract, or will I be coordinating separately?
- How many projects this size have you completed in the last year?
- Will you pull every required permit, or is that on me?
- Can I see photos of finished work in a home similar to mine?
- Can I speak with two recent clients?
Red Flags to Walk Away From
- A bid dramatically lower than every other estimate, with no explanation for the gap.
- Reluctance to provide proof of license or insurance.
- Asking you to pull your own permits.
- No written contract, or a contract missing a payment schedule.
Step 4: What Permits Will You Actually Need?
Confirm your permit requirements with your city before you sign a contractor contract, since permit timelines directly determine your start date. Most Minnesota cities require a permit for any bathroom work touching plumbing, electrical, or the room’s structure, even if you’re not moving walls.
Per the Minnesota Department of Labor and Industry residential code, a bathroom needs either a window with at least 3 square feet of glazing, half of it operable, or a mechanical exhaust fan rated at 50 CFM minimum, vented directly outdoors. That requirement alone triggers a permit on most full remodels.
Permit Checklist
- Ask your contractor which permits your specific project needs.
- Confirm who is responsible for submitting the application, you or the contractor.
- Build permit review time into your start date, not your finish date.
- Keep copies of every approved permit and passed inspection for your records.
| Project Scope | Permits Typically Required | Typical Twin Cities Fee Range |
|---|---|---|
| Cosmetic refresh (paint, hardware, no plumbing moves) | Usually none | $0 |
| Standard full remodel (new fixtures, same footprint) | Building, plumbing, electrical | $150 – $450 |
| Full gut with plumbing relocation | Building, plumbing, electrical, plus rough-in inspection | $300 – $700 |
| Layout change or wall removal | Building, plumbing, electrical, plus structural review | $500 – $1,200+ |
Ready to see what your specific project would cost once permits and materials are factored in? Our pricing tool builds in your project type and finish level. Price Your Bathroom Remodel →
Step 5: When Should You Order Your Fixtures and Materials?
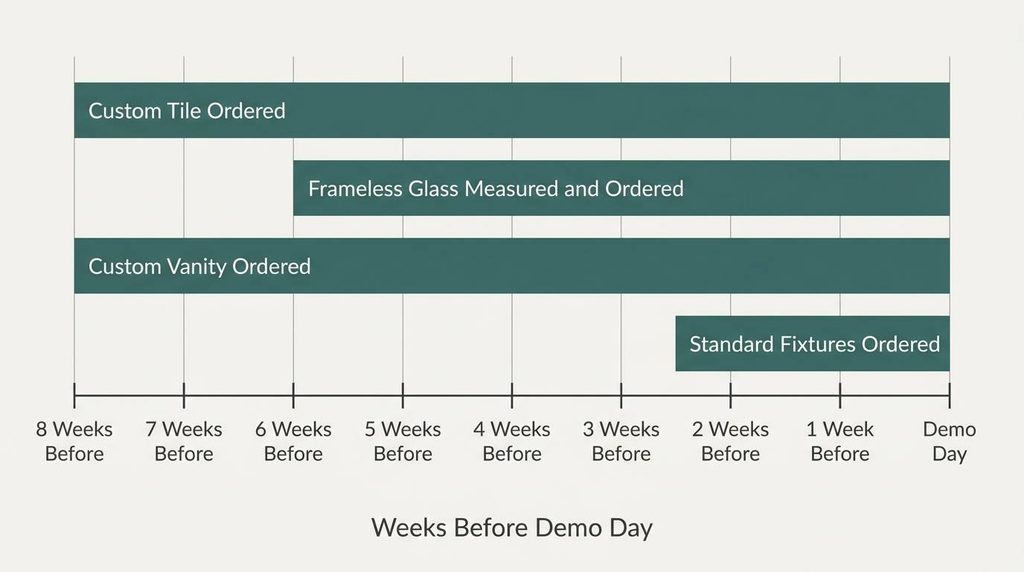
Select and order your tile, vanity, shower glass, and fixtures before demo starts, not after, since custom materials routinely carry 4 to 8 week lead times. Ordering late is one of the most common reasons a finished project sits half-done for weeks.
Fixture choice also affects your water bill for as long as you own the house.
According to EPA WaterSense, giving a bathroom a high-efficiency makeover with a WaterSense labeled toilet, showerhead, and faucet aerator can pay for itself in as little as one year through water and energy savings.
Fixture Selection Checklist
- Confirm your shower type before ordering tile: a walk-in shower and a tub-shower combo need different framing.
- Choose WaterSense labeled fixtures where available for long-term savings.
- Order tile, vanity, and glass the same week you sign your contract, not the week before demo.
- Confirm lead times in writing from your supplier, not just your contractor’s estimate.
Still deciding between a walk-in shower and keeping a tub? We broke down the cost and resale trade-offs in detail. Read: Walk-In Shower vs. Tub →
| Material or Fixture | Typical Lead Time | Why It Matters |
|---|---|---|
| Stock vanity | 1–2 weeks | Rarely a scheduling risk |
| Custom or semi-custom vanity | 6–10 weeks | Order before demo, not during |
| Ceramic or porcelain tile (in stock) | 1–3 weeks | Confirm quantity covers waste and cuts |
| Custom or imported tile | 4–8 weeks | The most common cause of project delays |
| Frameless glass shower enclosure | 3–6 weeks | Measured after framing, ordered immediately after |
| Toilet, faucet, showerhead (standard) | 1–2 weeks | Low risk unless discontinued |
Step 6: How Do You Prepare Your Household for the Disruption?
Prepare a plan for daily routines before demo starts, especially if the bathroom being remodeled is your only full bathroom. Most full remodels take 3 to 7 weeks, and that’s a long stretch to improvise your morning routine.
Disruption Checklist
- Confirm you have access to a second bathroom, or plan for a neighbor’s, gym membership, or short-term arrangement.
- Set up a temporary space for toiletries and towels away from the construction zone.
- Ask your contractor about dust containment, especially if anyone in the household has respiratory sensitivities.
- Agree on daily work hours and a point of contact for questions once work begins.
A Detail Homeowners Forget
Pets and small children need a plan too.
An open bathroom during rough plumbing is not a safe space to wander into unsupervised. Decide where they’ll be during work hours before the first day, not on it.
Step 7: What Should You Check Before the Final Walkthrough?
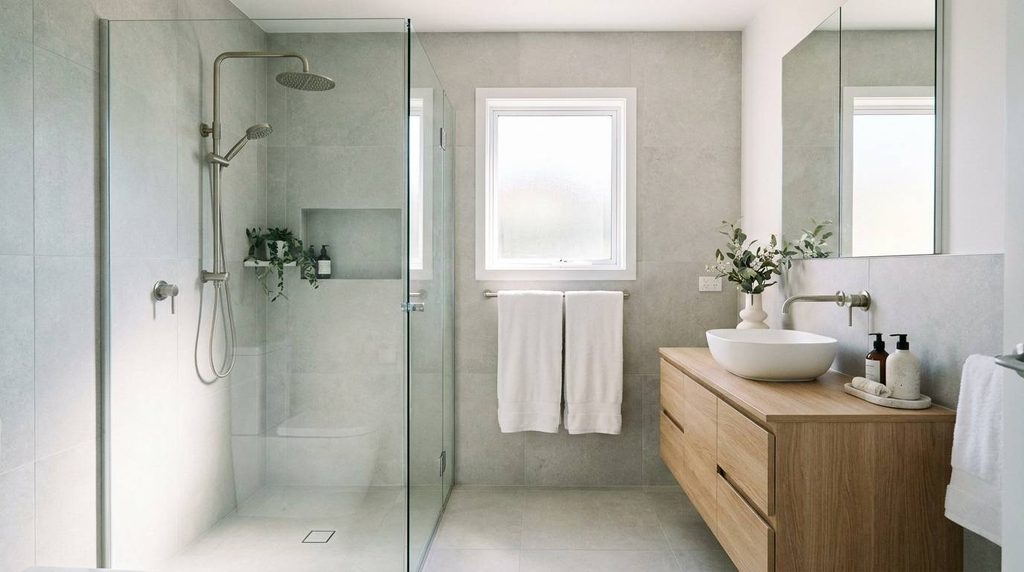
Walk the finished bathroom with your contractor and a written punch list before releasing final payment, checking every fixture, seal, and finish against what you agreed to. This final step is where small mistakes get caught before they become permanent.
Final Walkthrough Checklist
- Run every faucet and the shower for at least five minutes, checking for leaks at every connection.
- Flush the toilet multiple times and check the base for movement or leaking.
- Test the exhaust fan and confirm it vents outdoors, not into an attic or crawl space.
- Check grout lines and caulk for gaps, especially around the shower base and tub.
- Confirm every outlet is GFCI protected and working.
- Open and close the vanity doors and drawers, checking alignment.
- Ask for copies of your final inspection approval and any product warranties.
What Should You Look for in a Design-Build Partner for This Process?
Look for a contractor who manages design, permitting, and construction under one roof, since a bathroom remodel touches more trades than almost any other room in the house. Coordinating plumbing, electrical, tile, and finish work through separate parties is where most of this checklist starts to break down.
A single point of contact means one person is accountable for the schedule, not three subcontractors pointing at each other.
Ready to work through this checklist with a team that handles all of it under one contract? See how our design-build process works from first sketch to final walkthrough. Explore Our Bathroom Remodeling Services →
Your Next Steps
Before you contact a contractor, do these three things:
- Write down your hard budget number, plus contingency. Put it in writing so it doesn’t quietly grow.
- List your must-haves and your wants, separately. Bring both lists to your first meeting.
- Check your city’s permit requirements online or by phone. Most Twin Cities building departments post this directly on their website.
Once you’ve done that, you’re ready for a real conversation with a contractor instead of a guessing game.
Frequently Asked Questions about Bathroom Remodel Checklist
Do I need a permit if I’m only replacing fixtures and not moving anything?
A straightforward fixture swap, like a new toilet, faucet, or vanity in the exact same location, often doesn’t require a permit in most Twin Cities cities. The moment you add a new electrical circuit, change your ventilation, or touch supply and drain lines, most municipalities require plumbing and electrical permits regardless of whether walls move.
Should I order my tile and fixtures before or after signing a contractor contract?
Order your materials as soon as your contract is signed, not before you have a firm scope and not after demo starts. Ordering before a signed contract risks buying the wrong quantity or style for your final layout, while waiting until demo starts is the single biggest cause of mid-project delays.
What percentage should I actually budget for contingency?
Fifteen to twenty percent is the realistic range for most Twin Cities bathroom remodels, and homes built before 1990 tend to land at the higher end. Full gut renovations that open walls and floors carry more risk of hidden damage than a cosmetic refresh, which justifies a larger cushion.
Is one working bathroom enough during a full remodel, or should I plan something else?
One working bathroom is usually enough for a single adult or couple, but households with young kids, multiple people on the same morning schedule, or anyone with mobility needs should plan a backup, whether that’s a neighbor, gym membership, or short stay elsewhere. Ask your contractor for a realistic estimate of how many days the bathroom will be fully unusable, since that number is often shorter than the full project timeline.
How many weeks before I want the project finished should I start this checklist?
Start this checklist at least 8 to 10 weeks before your target finish date if you’re ordering any custom tile, vanity, or glass, since those lead times alone can run 6 to 8 weeks. A cosmetic refresh with in-stock materials can compress that timeline to 3 to 4 weeks total from first contractor call to finished bathroom.
A Checklist Only Works If Someone Follows It Through
Every homeowner starts this process with a Pinterest board and good intentions.
The ones who end up happy with the result are the ones who worked through budget, permits, and fixtures in order, instead of skipping straight to the fun part. We’ve walked Twin Cities homeowners through this exact checklist for years, from the first budget conversation to the final walkthrough.
If you’re ready to turn this list into an actual plan for your bathroom, we’re ready to sit down with you.
Ready to put this checklist into action? Bring us your budget, your must-have list, and your timeline, and we’ll tell you what’s realistic. Talk to Our Team →